
One of the things that the National Mah Jongg League does is publish, annually, a card with all of the approved Mah Jongg hands for that particular year. The hands in Chinese Mah Jongg are not regulated this way, and I've often wondered if Chinese Mah Jongg would be harder or easier than American Mah Jongg. But, it is what it is, and I can only assure a new player that your head will stop hurting eventually.

Naomi finds that clutching her head sometimes helps (and so does wine).
Ordering Your Card
To order your card of approved American Mah Jongg hands from the National Mah Jongg League, go to: www.nationalmahjonggleague.org. A standard-print-size card is $7, and a large-print-size card is $8. I highly recommend getting the large print card for an extra dollar. When you're busy consulting your card during play, the last thing you need is to be doing is squinting.
Because the National Mah Jongg League's card is copyrighted, I cannot reproduce it here, so I will just make up some examples to explain how to choose a hand to play.Mah Jongg Hands
The hands you build in Mah Jongg are analogous to the hands in Canasta and gin rummy; that is, you strive to collect units that look a little like runs and sets. The prescribed hands are 14-tile combinations of numbers, winds, dragons, and/or flowers.
For example, one of the hands on your card may look like this: FFFF 111 22 333 DD. This means that you want to collect four flowers (FFFF), a set of consecutive numbers (all in the same suit), plus a pair of dragons (DD) in the same suit as the numbers.
The hands are also notated by color. The above hand appears all in the same color, so the numbers must all be of the same suit (Bams, Craks, or Dots). In addition, the pair of dragons must be the dragon that accompanies the suit of the numbers (Green Dragons go with Bams, Red Dragons go with Craks, and White Dragons go with Dots). If the hand on the card looks like this: FFFF 111 22 333 DD, then two different suits would be involved. That is, the dragons would have to be of a different suit from the numbers.
Sometimes, new players get confused because the three colors on the cards are red, green, and blue, and the player thinks, for example, that if the "D" is in red, it must mean Red Dragons. Not so. It just means a suit other than that which is used for the rest of the hand.
[Click on the images below to enlarge them.]
Initial Assessment of Your Hand
Before the Charleston begins, arrange the tiles you've drawn, grouping them in categories.
For example, if, initially, your rack looks like this:
Sort it to look like this:

The 13 tiles you've drawn may not closely resemble one of the 50 or so hands printed on your card. You will notice, however, that the cards are divided into sections such as 2-4-6-8 (even numbers), 1-3-5-7-9 (odd numbers), consecutive runs, winds & dragons, etc. By comparing your tiles with the these categories, you'll see the relative strengths of your hand. This will help you decide which tiles to pass during the Charleston.

With the above rack, you see that you have a pair of 5 Dots and a pair of 6 Craks. Consulting your card, you see that under "Consecutive Run," there is this hand: FF 1111 2222 3333. Next to the hand is a notation that says, "Any 3 consecutive numbers." This means that you could use your 5 Dot and 6 Crak pairs to begin building that hand. You notice that you also have a Flower. You decide to hold on to these 5 tiles, and you select three tiles that don't fit into that hand to pass during the Charleston. Even though you have two winds and a dragon, in this case, you might decide to not make a wind-dragon hand.
During the Charleston, you pass these three tiles:

You receive these three tiles:
 Obviously, you could use the 4 Bam to make the third part of the consecutive number sequence, because it is a different suit from the 5 Dots and the 6 Craks. As you look at the card of possible hands again, you notice another hand that uses Flowers and numbers from mixed suits. That hand looks like this: FFFF 5555 6666 11. You decide to hold on to the 1 Bam (Bird-Bam), just in case you decide to make this hand instead of your initial choice.
For the next step of the Charleston, you pass these three tiles:

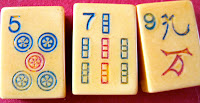
What luck! You can use the 5 Dot in either of your possible hands, and the 7 Bam could be in the alternative third suit of your consecutive run, in case you don't get any more 4 Bams.

The Charleston isn't even finished yet, and already most of your tiles could be used in a Mah Jongg!

No comments:
Post a Comment